WIKD500 HID FOG-LIGHT INSTALL
I ordered my Fog-Light kit from HIDGUY the neat part about this, is they are locally in San Diego, CA and I was able to pick them up and install on a Sunday. Oscar owner of HIDGUY.net was kind enough to open his shop and test the kit before selling them to me. The kit I requested was something close to the factory look. Him and others form another Shelby site said to go with the Xentec 5000K Slim Ballast HID kit Part #5202 for a 2009 SHELBY GT500.

Everything in the kit looks of good quality. The install was a breeze and the meaning of Plug and Play was dead on.
1st step was to lift the car and once underneath the fog lights are easy to get too. Hear are images of the rear of the fog lights.:

2nd step was to squeeze the black connector from the fog light:

Connector Removed

3rd Step is to install the new HID Fog Lamp. Here the new lamp compared to the original lamp

Here is the New HID Fog Lamp installed

All the connectors only go on one way and the hardest part of the install was looking for a place to mount the ballast. They do come with double sided sticky tape and some tie wraps. Which I used both due to not trusting the double sided type.

I found a pretty nice location and installed near the fog lamp assembly.

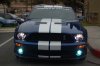
Once everything was installed here is the before and after pics..
BEFORE

AFTER

More Pics
I ordered my Fog-Light kit from HIDGUY the neat part about this, is they are locally in San Diego, CA and I was able to pick them up and install on a Sunday. Oscar owner of HIDGUY.net was kind enough to open his shop and test the kit before selling them to me. The kit I requested was something close to the factory look. Him and others form another Shelby site said to go with the Xentec 5000K Slim Ballast HID kit Part #5202 for a 2009 SHELBY GT500.
Everything in the kit looks of good quality. The install was a breeze and the meaning of Plug and Play was dead on.
1st step was to lift the car and once underneath the fog lights are easy to get too. Hear are images of the rear of the fog lights.:
2nd step was to squeeze the black connector from the fog light:
Connector Removed
3rd Step is to install the new HID Fog Lamp. Here the new lamp compared to the original lamp
Here is the New HID Fog Lamp installed
All the connectors only go on one way and the hardest part of the install was looking for a place to mount the ballast. They do come with double sided sticky tape and some tie wraps. Which I used both due to not trusting the double sided type.
I found a pretty nice location and installed near the fog lamp assembly.
Once everything was installed here is the before and after pics..
BEFORE
AFTER
More Pics