• Hello there guest and welcome to our forum!
    To gain full access you must Register. Registration is free and it takes only a few moments to complete.
    Already a member? Login here then!

Project fukstain Thread 1 (Disassembly)

Status
Not open for further replies.

Gibs

Well-Known Member
Staff member
Global Moderator
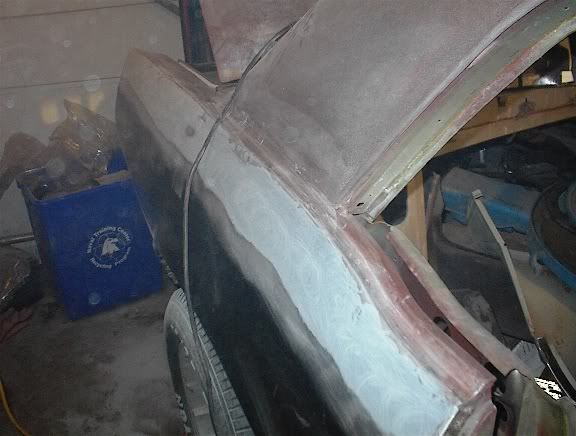
This thread will be for updates on the tear down and rebuild of my 1967 Ford Mustang Coupe. It is quite rotted and needs alot of work. There are some really aggressive plans for it.
Here is a list of what I hope to accomplish with it:
Acapulco Blue Metallic Paint
Two Tone Blue Deluxe Interior
18" Torque Thrust Rims with BFG KDWS
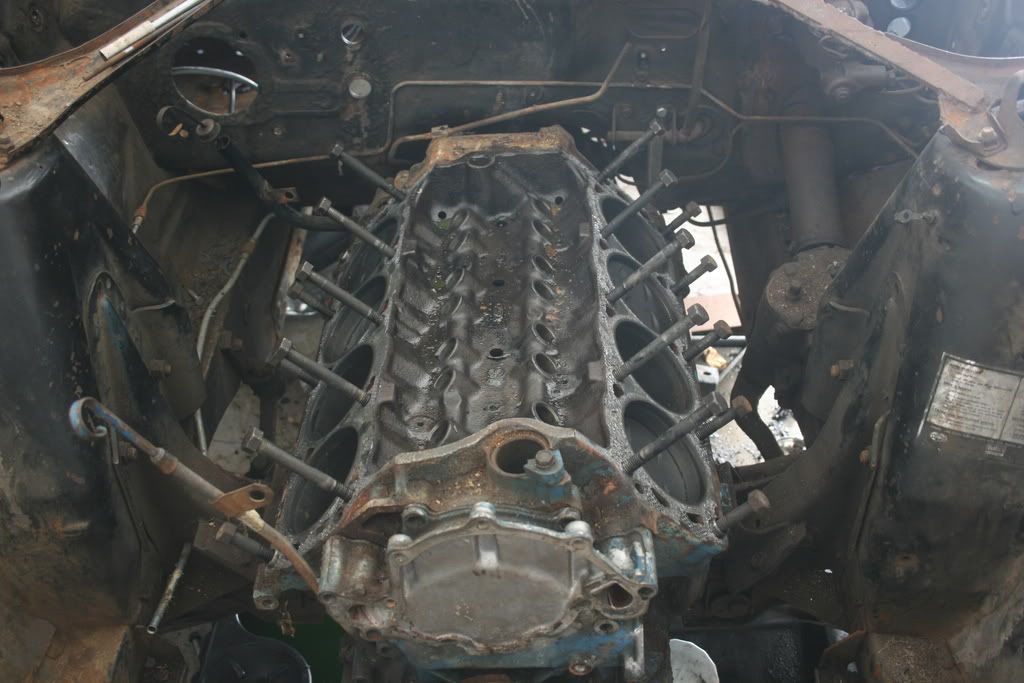
302, .030 with Edelbrock power package of Performer RPM Heads
Performer RPM Intake
Performer 600 CFM Carb
Performer Power Pack Cam
Kieth Black Pistons
Rods(Brand TBD)
3.73 Limited Slip Rear end
T-5 Conversion
Aluminum Radiator
A/C from Classic Auto Air
Turn Signal Hood
Foglights added to the grille bars
Wilwood 4 wheel disk brake upgrade
Rack and Pinion Steering unit(May not happen due to budget restraints)
Power steering
Tachometer added to gauge cluster
Upper and lower full length consoles

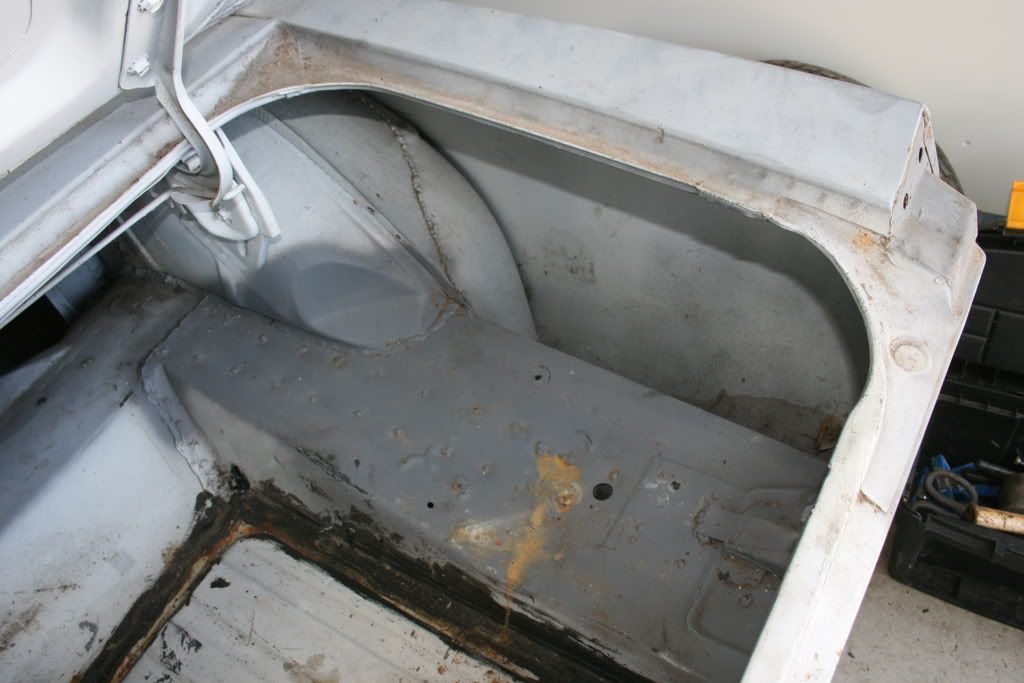
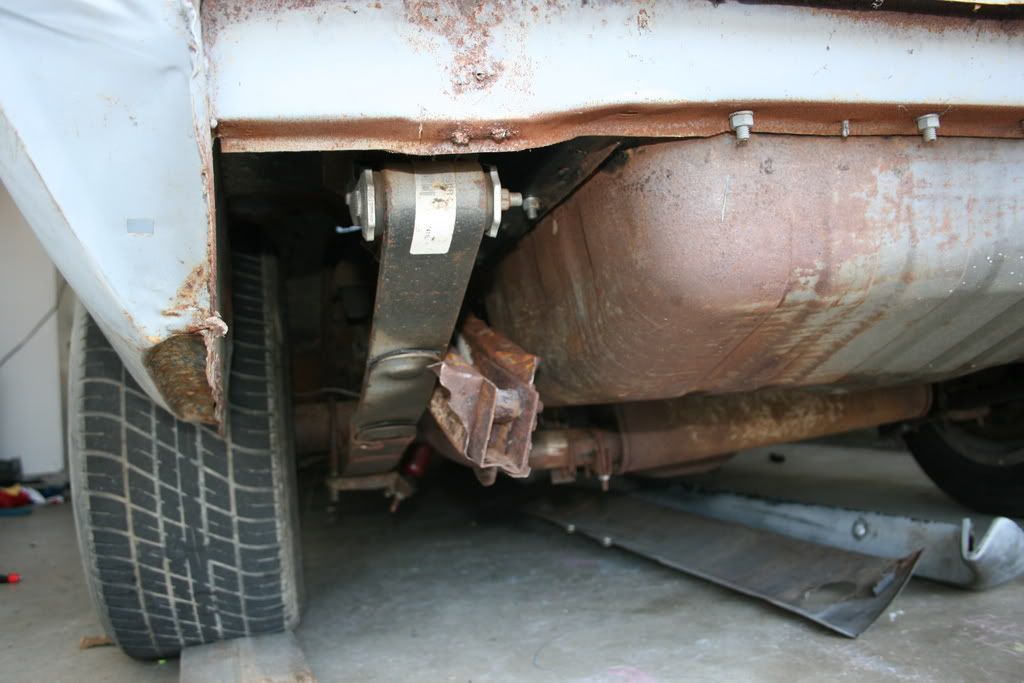
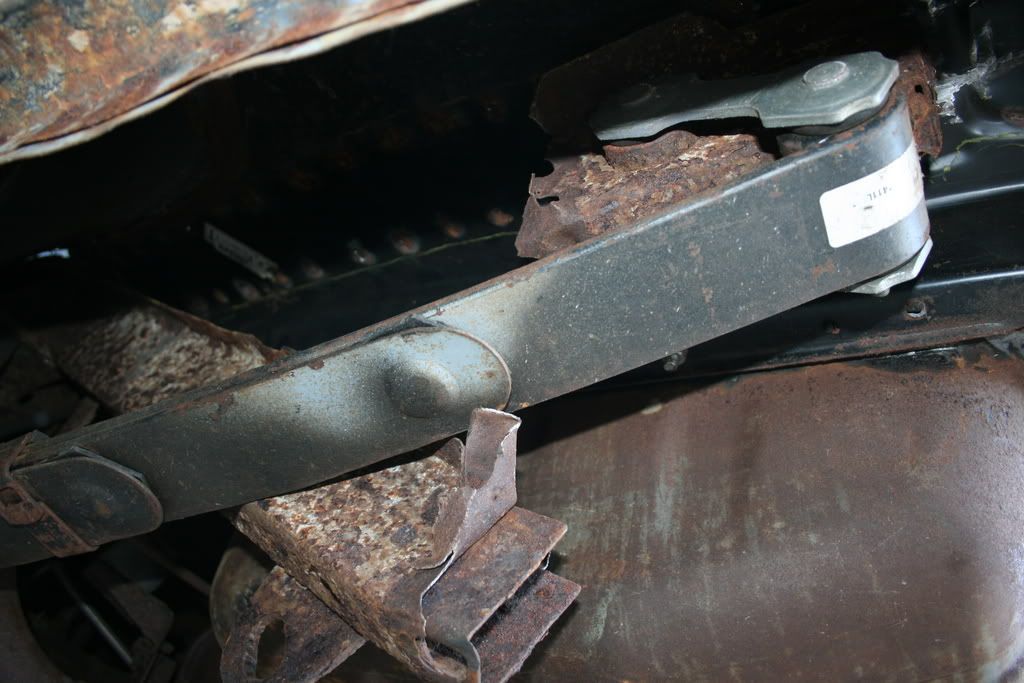
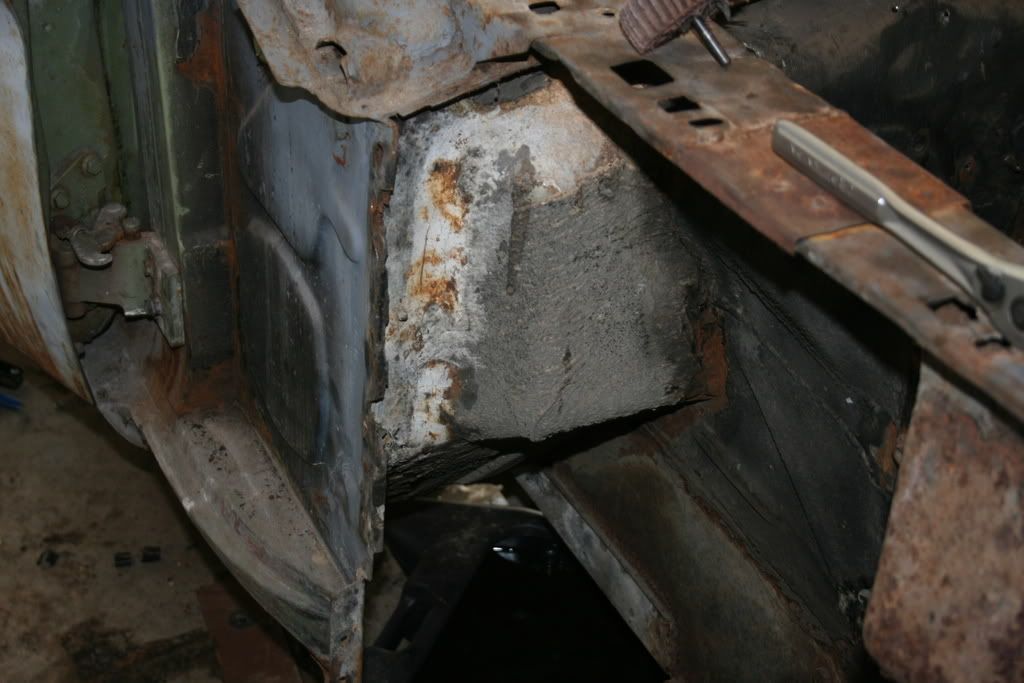
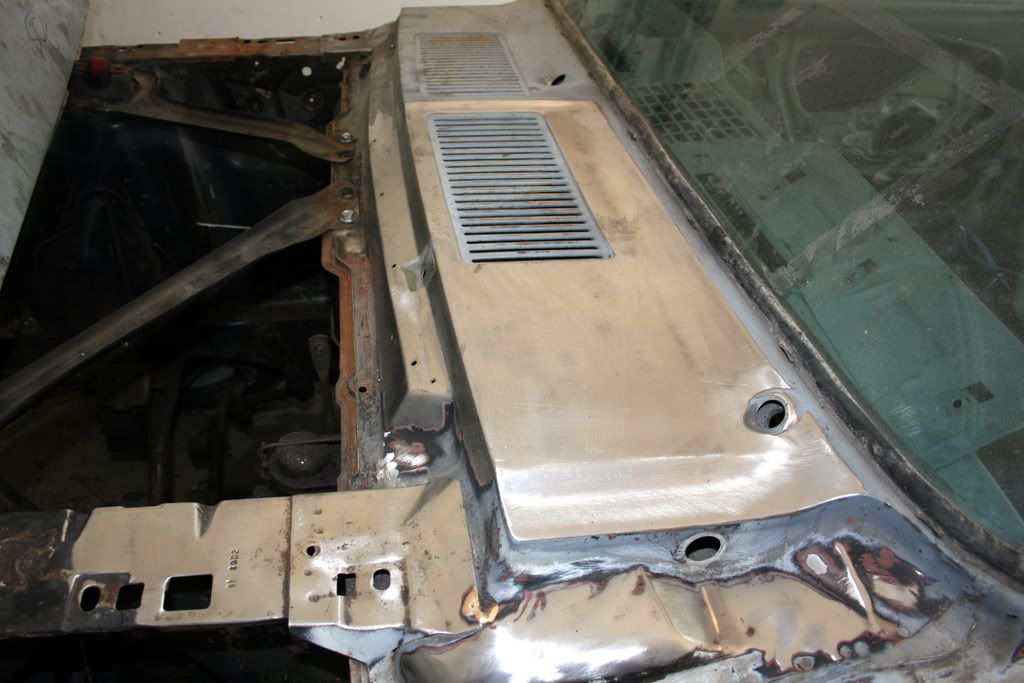
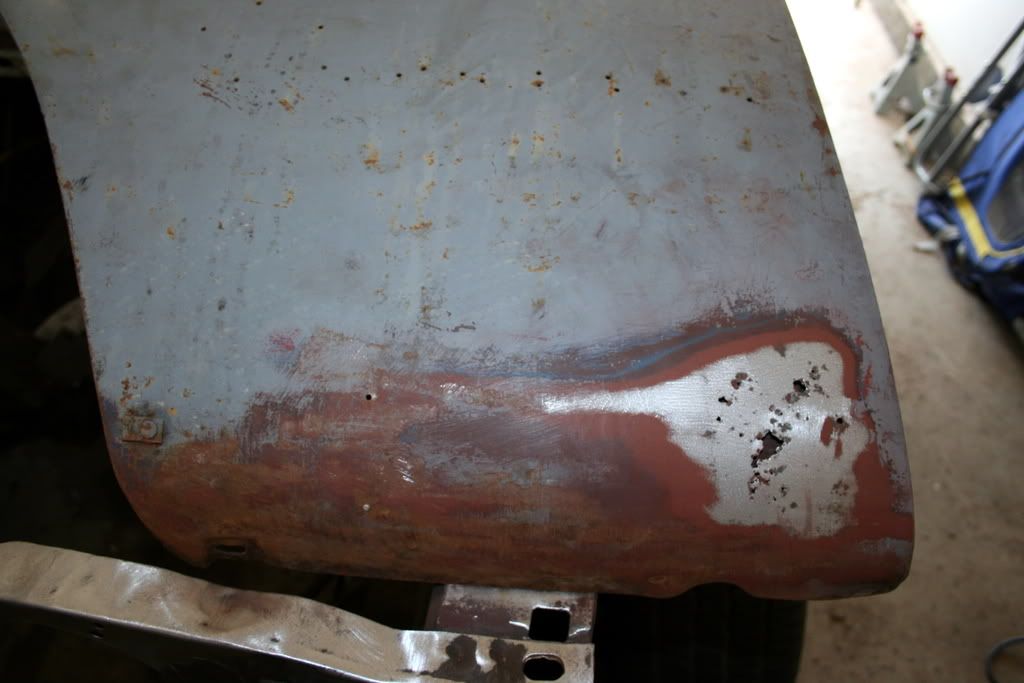
Now for the metal work needed:
Rear Frame Rails
Trunk Floors
Rear Quarters repaired
New door skins
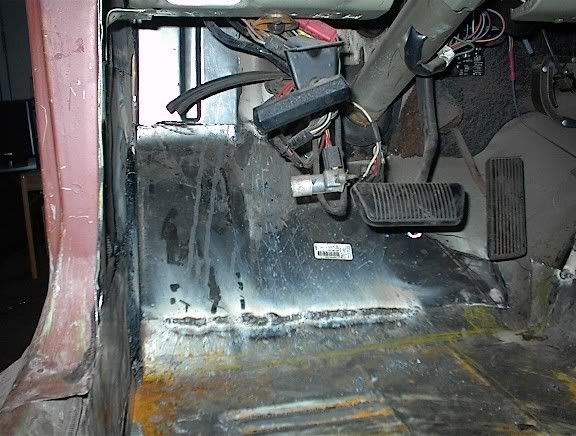
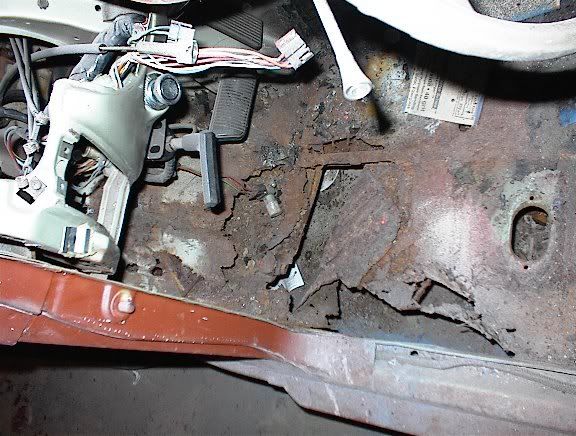
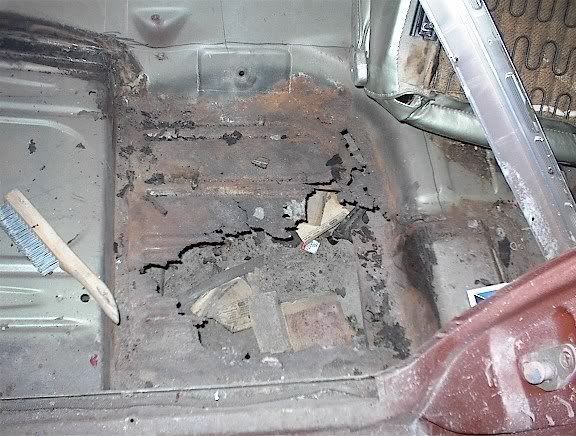
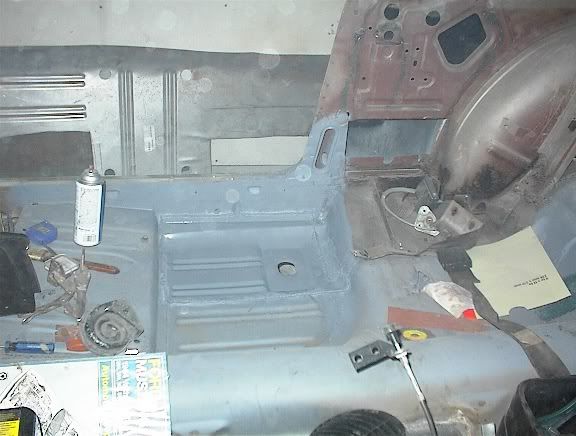
Left and right floorpans and seat risers
Outer firewall repaired
Toeboards repaired
Cowl Side panels repaired
Engine bay metal repaired
New fenders
New Front Valance
New Rear Valance
New Bumpers
2.5" dual exhaust with Headers and Flowmaster mufflers

Yes this is a long list of things to be done. I have nothing but time and obviously a little bit of mney that I can throw away to make this car into a very nice ride. My only fear is that I will not want to drive it all the time once I get alot of this stuff done.

Wish me luck and I will update as I make progress.....


Gib
 

Gibs

Well-Known Member
Staff member
Global Moderator
OK first status report is:

Car Arrived on the truck Thursday 24 July 2008.

On Saturday after returning from Carlsbad I started tearing into the car. I have to completely strip it down to save man hours for disassembly by the Body Shop.

I started in the rear and have completely taken apart everything in the trunk area. No more lights, bumpers, wiring, weatherstripping. I found some issues with it today on this one. A broken frame rail on the drivers side that also bent and caused a small amount of damage to the inner wheel well and to the trunk floors(They need replaced anyway).

I also ripped up a bunch of the interior. The following has been removed from the interior: Back seats, Drivers seat, dash has been taken apart, wiring removed, seatbelts removed, wiper motors and connections removed.

I will post pics next time of the progress.


Gib
 

Gibs

Well-Known Member
Staff member
Global Moderator
Well I only have a few pics of it but......

As you will see it needs alot of work. Alot of the rusted areas are parts that were welded in and never protected 5.5 years ago. So they have alot of surface rust on them. We never got to grinding down welds or any of that back then. I ran out of time and had to trasfer to the west coast. So this time I am not worried about time....having someone else do the metalwork.


Dirty A$$ engine bay....EFI to be gone soon:
IMG_8180.jpg


Removed Parts:
IMG_8181.jpg


Interior after partially disassembled. None of that is there now:
IMG_8182.jpg


Trunk floor drivers side:
IMG_8183.jpg


Trunk Floor Passenger side:
IMG_8186.jpg


Broken Rear Frame Rail on drivers side:
IMG_8188.jpg


Another angle of the frame rail:
IMG_8192.jpg
 

Gibs

Well-Known Member
Staff member
Global Moderator
More pics from today......

Well the heads, lifters, and pushrods look good, as well as the piston tops. Still searching for the cause of the knocking sound when accelerating. Not much left to look for it in so I am closing in on the issue.


Work done today:
Drained fluids
Removed Gas tank
Removed exhaust
Removed Lower Intake manifold
Removed Radiator
Removed Starter
Removed Heads
Removed Fan and pulleys
Removed Alternator
Removed Fuel pumps
Removed the EFI Computer
Took out lifters and pushrods

Problems:
Need a Damper puller! (was dying to get the cam out today to see if it is the problem)
Always make sure you have enough drain pans for all fluids.....had to borrow a 3rd one from the neighbor...
Gas that was in the tank and in the fuel pumps appeared to be adark brown color, expected from a 41 year old tank though.

Items found:
1 3/8 in drive deep well socket lodged next to the motor mounts. Was not one of mine from working on it last time. It was a MAC Tools one. It is trash though as it was cracked.

Pics of engine bay now:
IMG_8292.jpg

IMG_8294.jpg

IMG_8304.jpg


Closer view of the piston tops: (they have some buildup on them but that is due to the engine not running quite right. No damage to them though) The dust in there is stuff that dropped into the engine bay after heads were removed.

IMG_8305.jpg


Heads: (a little rusty on the outside but in good condition)
IMG_8296.jpg


VIN:
This shows that the inner fender panel has not been replaced before or that it was done very well because originals had one VIN stamp that was visible and the other was hidden under the fender itself. There is also one on the passenger side too. Guess no one ever replaced the panels.

IMG_8299.jpg


Thanks for looking!!!

Gib
 

Gibs

Well-Known Member
Staff member
Global Moderator
OK so removed the following stuff today:
Cam Shaft
Timing Chain
Pistons
Crank Shaft
Engine Block
Oil Pump

Issues found:
Cam lobes were worn out...Every lobe has visible wear to it.
Not sure how bad this is but the timing chain seemed loose to me. If it were a chain on a bike I would not ride it for fear of it coming off. Had about 1/2 inch of play in the chain.....Damn previous owners"Quality Rebuild" My AZZ...
#7 and #8 rod bearings were worn out
#3 Main Bearing was showing wear on the bearing face and on the side of the bearing...
Nasty Sludge in the Oil Pan.
Only portions of a gasket were around the oil pan, most of it was Blue RTV.....and LOTS of it!

Lessons Learned:
Engine blocks are heavy...get help to remove them from the car.
Drop the tranny before removing the engine...Having to pick up the engine to get the Crankshaft out is a *****.
Always fully drain the Torque Converter.....It makes a huge mess that you can not stop without killing yourself to get out of the engine bay to get something to stop the massive red flood.
Always make sure you have proper things to use as support for the tranny....See pic 1 for this one.
Dont ever say hey watch this!!! I will not disclose the reason for this....TRUST ME whatever comes next is not good.

Thanks for looking. Next weekends topic: Tranny and driveline removal.....Hope the car is sitting level and does not roll out of the garage, down the Mt Everest driveway and through the living room of the neighbor across the street....Just kidding. Wheel blocks will be used...

On to the pics from today...

Engine bay without engine....Yes that is a coffee can with a plastic toolbox on top of it to support the tranny to take the pressure off the crank to allow it to come out.....Jackstands were in the storage out back....Preparation is key!
IMG_8308.jpg


Close up of the front of the tranny.....No Phil calm down it isnt that kind of tranny.....LOL
IMG_8309.jpg


Nope not the original Engine.....Wrong date code. I knew a 302 wasnt right for this car but thought it may have at least been from the same decade....Believe it came from a 77 Versailles but could be wrong..
IMG_8312.jpg


Cam...condition as discussed earlier...
IMG_8313.jpg


All 8 pistons and rods. #1-#4 are the top row left to right and #5-#8 are the bottom left to right.....
IMG_8314.jpg


#7 Rod Bearing.....yep that one is trash.....
IMG_8315.jpg


#8 Rod Bearing......Another garbage one..
IMG_8316.jpg


Crankshaft. Bearings worn but crank appears in good condition.....
IMG_8317.jpg


Cam and pistons together.....
IMG_8319.jpg
 

Gibs

Well-Known Member
Staff member
Global Moderator
OK new update with some pics....

Today:
Driveline removed
Tranny unbolted and removed
Red Flood from tranny again
Passenger door taken apart

Issues:
None this week

Things to note about the car:
C-4 is marked with C6**-*** so it either came out of a 66 Mustang or was leftover and used in my 67 when it was built....Either way I havent a clue which one but it will be going away anyway.
And, the engine was from a 78 Lincoln. It was built on June 21st 1977. That day I was one.....Hope my motor looks better than this one..LOL

Stuff left before getting her to the shop for a makeover:
Taking the old gaslines from underneath the car......
As you will be able to tell from the pictures below, whoever built this engine did something wrong.... It was rebuilt before I got it and has maybe 1500 miles on it since then. It was never run with low fluids or driven hard. It made a trip from Chicago to Maryland and sat there for a long time. That is all the miles on this engine.....Yeah I am convinced this was my problem. These were FoMoCo bearings....

Pics are of the bearings....

These are the rod bearings....U=Upper L=Lower
1-4
IMG_8321.jpg


Number 1 Upper Rod Bearing:
IMG_8326.jpg


Number 1 Lower Rod Bearing:
IMG_8327.jpg


Number 2 Upper Rod Bearing:
IMG_8329.jpg


Number 2 Lower Rod Bearing:
IMG_8330.jpg


Number 3 Upper Rod Bearing:
IMG_8331.jpg


Number 3 Lower Rod Bearing:
IMG_8332.jpg


Number 4 Upper Rod Bearing:
IMG_8333.jpg


Number 4 Lower Rod Bearing:
IMG_8334.jpg


5-8:
IMG_8335.jpg


Number 5 Upper Rod Bearing:
IMG_8336.jpg


Number 5 Lower Rod Bearing:
IMG_8337.jpg


Number 6 Upper Rod Bearing:
IMG_8338.jpg


Number 6 Lower Rod Bearing:
IMG_8339.jpg


Number 7 Upper Rod Bearing:
IMG_8340.jpg


Number 7 Lower Rod Bearing:
IMG_8341.jpg


Number 8 Upper Rod Bearing:
IMG_8342.jpg


Number 8 Lower Rod Bearing:
IMG_8343.jpg


#1 - #3 Main Bearings:
IMG_8344.jpg


#1 Upper MB:
IMG_8345.jpg


#1 Lower MB:
IMG_8346.jpg


#2 Upper MB:
IMG_8347.jpg


#2 Lower MB:
IMG_8348.jpg


#3 Upper MB Side 1:
IMG_8349.jpg


#3 Upper MB Side 2:
IMG_8350.jpg


#3 Lower MB Side 1:
IMG_8351.jpg


#3 Lower MB Side 2:
IMG_8352.jpg


#4 & #5 MB's:
IMG_8353.jpg


#4 Upper MB:
IMG_8354.jpg


#4 Lower MB:
IMG_8355.jpg


#5 Upper MB:
IMG_8356.jpg


#5 Lower MB:
IMG_8357.jpg
 

Gibs

Well-Known Member
Staff member
Global Moderator
OK here are some pics now that it is torn down....

It really is not as bad as I originally thought. A good blasting will take care of alot of the surface rust and stuff. The main work will be in the rear area....basically cut the rear end out and replace with good metal....good god this is gonna get expensive. LOL it is only money and this is a part of history and American made so I can deal with it. If with the crappy rust protection Ford put on these originally lasted this long....When I am done this car may outlive me....

Dash Area:
IMG_8358.jpg


Drivers Door. You can see the red oxide primer they used in the factory... That is the overspray on top of the rust coating inside the door.
IMG_8362.jpg


Empty engine bay....I need a small sand blaster to use with the AC to strip this down...alot of surface crap but nothing too major here. The panels are still good.
IMG_8364.jpg


Down the tunnel. You can see the rear end back there...anyone need 2.79 gears? Those are goin away! 3.73's FTW
IMG_8365.jpg


Firewall where the heater was at...As you can see from the rust on the toeboard area directly below the opening for the heater, it leaked and caused some rust damage.
IMG_8366.jpg


Master Cylinder and steering column. Brake fluid leaking had ate the paint and caused this area to have surface rust. Nothing that a good blasting and some Rust Encapsulator wont cure....
IMG_8368.jpg


Original driver shock tower sticker that tells how to care for the vehicle....pretty good shape for being 41 years old and having alot of corrosion in the area...
IMG_8369.jpg


Drivers side front fender well. surface rust but again nothing that a blasting wont cure....
IMG_8370.jpg


Very front of the fender well shown above...nothing but surface rust again. You can see marks where I used a scraper to remove some of the undercoating that was still there...
IMG_8371.jpg


Passenger door....Same condition as the drivers door.
IMG_8373.jpg


Passenger side rear sail/inner quarter area....next pic is a close up of the bad part....
IMG_8374.jpg


Close up of above picture...where the wheelwell meets the floor there is a hole there...and some more rotted out area in the middle of the pic almost at the bottom of the picture. No big deal here as those are being replaced when the torque boxes/frame rails are replaced. Just a cut and paste kind of job....that costs alot of ducets!
IMG_8375.jpg


Passenger side cowl panel.. are right in front of the doors that is covered by the fender. Damage here is only surface rust with the exception that the lip where the firewall and side panel meet is rotted and will need repaired.
IMG_8376.jpg


Transmission numbers....it is a 66 ford transmission part. possibly the original, even though I have a 67 it may have sat in the wharehouse waiting to be installed into a car for a year....or it was replaced at one time. It is a C-4 though.
IMG_8379.jpg
 

Gibs

Well-Known Member
Staff member
Global Moderator
OK so today I started to clean up the engine bay....Sanding down and such.....F THAT!!!
That is just way to much work. I see a Spot Blaster in my future. Palm sander does good but I am still vibrating from it. I did a few spots with it and then started stripping down the cowl. I got half of the cowl cleaned up. I also pulled the fenders out and checked them for body rot. To my suprise, the passenger fender is good to go. it will need cleaned up sanded down. There are a couple spots on it that are gonna need to be worked to get them straight but that is better than buying a cheap replacement one. The drivers fender needs a spot patched behind the wheel opening. It is a spot with a couple holes about 4x4. Again, that is better than buying an aftermarket one. The reproduction fenders need lots of work to fit, so these original ones will be better overall. They have thicker metal and better stamping and alignment. I removed what was left of the gas lines from the car. I spilled a little gas in the garage. They still had some in them. I also cleaned up the garage and used Kitty Litter to clean up my fluid spills. The underside of the car is good in some spots and just rotted out in others. It is almost like they treated portions and completely missed other spots....I stripped the seats down to parade rest. They were not as good as I thought they were. There is alot of surface rust on the frames. They will need blasted and powder coated/primed and painted. The mechanical components of them work real good still though. They just need a makeover. I will take pics tomorrow of how she sits now. Thanks for looking.


Gib
 

Gibs

Well-Known Member
Staff member
Global Moderator
OK Projecy Fukstain has changed direction......

I am not using my 302 block. I am going to be going with a 351W. I figure the only reason I was using a 302 is because I had the block already.....well hell I can get a Windsor block at the Pick and Pull for next to nothing. I will fit just fine due to the fact that they had a 390 option in 67.....And I will get more out of the Windsor too.


Gib
 

Gibs

Well-Known Member
Staff member
Global Moderator
OK so I took a few pics from yesterday.......

Drivers side cowl stripped to metal. Some paint still in the creases and edges
IMG_8389.jpg


Drivers fender rotted out....small spots.
IMG_8391.jpg


Close up drivers fender....
IMG_8392.jpg


Drivers door front lower corner. Yep I need new door skins....
IMG_8396.jpg


Half done.....
IMG_8397.jpg


Another view....still some that I could not get because of contours...
IMG_8398.jpg


Sanded down part of the door to show the hideous original color.....LIME GOLD.
IMG_8399.jpg


As I get ready to send it out to have them start work, I need to decide on a hood. Well here is a 67 Coupe in approximately the color I want mine with the Fiberglass Shelby style hood....

Shelby Hood.....
b041_3.jpg


Or this hood. The inserts have the turn signals built into them so when the blinker is on you see it. Was an upgrade option in 67....
f2d8_1.jpg


Thanks for the input.....
 

Gibs

Well-Known Member
Staff member
Global Moderator
OK so I found some pics from a long time ago of what I had before I tore it up originally and did a half ass job just to get the car back together.......

Like I said it was a basket case before I started and it still is.....I only put it all back together half assed because I was transferring and needed to drive it from Chicago to the East Coast. Otherwise I would have taken my time and done it correctly. This time I am not doing any of the metalwork though...

Drivers front floor pan
driverfloorpan.jpg


After a rush job at putting the area back together....
driversfrontfloor.jpg


Another of the drivers floor....
driverfrontfloor.jpg


Drivers rear floor.....
driverrearfloor.jpg


Patch to the passenger rear floor...
rearfloor.jpg


Passenger quarter skin installed with plug welds and fiberglass body filler over it to hide the seam...when done properly it would have been butt welded...
rightquarteralmost.jpg
 

sd04cobra

Well-Known Member
Hey, lookin' good buddy. Still a long way to go just pace yourself or you might get burnt out. Need any parts? I have a 67 fastback that I restored similar to this project. Looking to get rid of some stuff such as 9", suspension, motor components. Let me know! GL with the resto.
 

Gibs

Well-Known Member
Staff member
Global Moderator
I am good for now....Any old scrap pieces would be nice though. I would like to use original metal if possible. If you got any of the metal that you took off let me know.....


Gib
 
Status
Not open for further replies.
Top