• Hello there guest and welcome to our forum!
    To gain full access you must Register. Registration is free and it takes only a few moments to complete.
    Already a member? Login here then!

5 Gallon Fuel Cell Install [*DONE!*]

OH NO, I remember the last time you added a bunch of goodies to the car. My head is still spinning attempting to figure out all the changes.

I think you'll need a few days at the track to test out the new add-ons, let alone getting it set up to run faster. WOW, the labor is almost done, but the hard work hasn't even started. KEEP ROLLING!!!
 
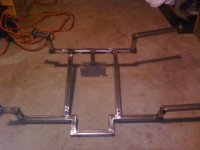
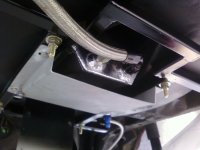
Well I made my last modification to this bracket today. I didn't like how close the fuel pump was going to be to the diff cover, so I cut it off and then welded a stand off on and then welded the fuel pump bracket to that. I weighed the chunk of metal that has transpired and it's 15lbs.

The fuel cell weighs about 2-3lbs. Then figure in the fact that 5 gallons of fuel weighs 35lbs. I was filling up with 10 gallons of fuel on race days, so now that I have a 5 gallon cell no matter what happens it's still at least a 35lb weight loss.

I'm going to grind some of the welds flat and then sand blast and paint it. Once installed I will take some more pics.

fuelcellsupportbracket.jpg
 
Today I hit the garage at 3pm and was able to get alot done today. First I finished cutting out the Baseline suspensions Anti-Roll Bar before moving on to installing the fuel cell.

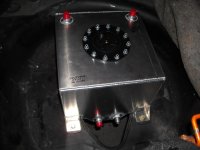
After I was satidfied with how the frame rails looked after all of the cutting and grinding I fit up the fuel cell support bracket and welded it in place. Once it was welded in place I put the fuel cell back together (foam inside and cover back on). Then I placed it in the trunk and bolted it up.

DSCN0644.jpg

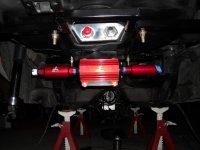
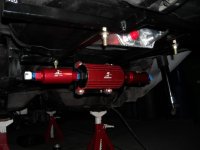
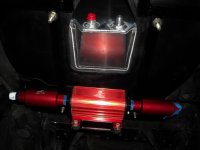
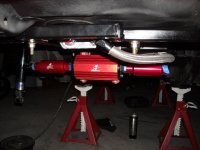
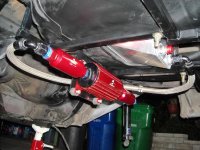
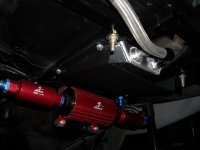
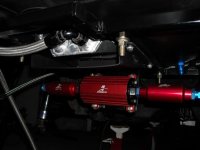
Next I installed the new (used) Aeromotive fuel pump and filters onto the support bracket.

DSCN0645.jpg

DSCN0646.jpg

DSCN0649.jpg

Finally once the fuel pump was mounted I went ahead and assembled the -10an line from the cell to the inlet fuel filter.

DSCN0650.jpg

DSCN0651.jpg

Next on the agenda will be to run the feed line up front to the engine bay and build and complete the new fuel system. Thanks for looking!
 
Ok, guys something has been brought to my attention thanks to sbftech.com. As it sits right now my car would not pass tech at an NHRA sanctioned track. Other than the fact that the trunk must be sealed once you install a cell.

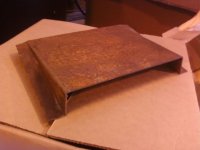
Any part of the cell that is outside the body of the vehicle (Sump) must be enclosed save for the rear where the fittings are located. Basically you have to build a shield around the sump so that if you do a wheel stand or debris flies up it cannot penetrate the sump. This is an easy fix as I am building a bolt on shield this week at work. I made one out of card board yesterday and now I'm working on making one out of metal. I will post pics when it's complete.

Here is the rules straight from the rule book, general Regulations, section 20.4:

1:5 FUEL SYSTEMS
Location: All fuel tanks, lines, pumps, valves, etc. must be outside
of the driver’s compartment and within the confines of the frame
and/or steel body. Cool cans, fuel-distribution blocks, etc. must be
located at least 6 inches forward of the flywheel/bellhousing area on
rear-wheel-drive (RWD) vehicles, and on opposite side of
flywheel/housing area on front-wheel-drive (FWD) vehicles. Fuel
pressure gauge isolators, with steel braided line, may be mounted
on firewall.


Tanks: When permitted by class regulations, fuel tanks located
outside body and/or frame must be enclosed in a steel tube frame
constructed of minimum 1 1/4-inch O.D. x .058 chromoly or .118
mild steel tubing. All fuel tanks must be isolated from the driver’s
compartment by a firewall, completely sealed to prevent any fuel
from entering the driver’s compartment. All fuel tanks must have a
pressure cap and be vented outside of body. A positive-locking
screw-on fuel tank cap is mandatory on all open-bodied cars.
Insulated fuel tanks prohibited. When used, fuel cells must have a
metal box protecting the part of the fuel cell that is outside of body
lines or trunk floor, excluding hose connection area in rear. Nonmetallic
fuel cells or tanks must be grounded to frame.
 
Ok, guys something has been brought to my attention thanks to sbftech.com. As it sits right now my car would not pass tech at an NHRA sanctioned track. Other than the fact that the trunk must be sealed once you install a cell.

Any part of the cell that is outside the body of the vehicle (Sump) must be enclosed save for the rear where the fittings are located. Basically you have to build a shield around the sump so that if you do a wheel stand or debris flies up it cannot penetrate the sump. This is an easy fix as I am building a bolt on shield this week at work. I made one out of card board yesterday and now I'm working on making one out of metal. I will post pics when it's complete.

Here is the rules straight from the rule book, general Regulations, section 20.4:

1:5 FUEL SYSTEMS
Location: All fuel tanks, lines, pumps, valves, etc. must be outside
of the driver’s compartment and within the confines of the frame
and/or steel body. Cool cans, fuel-distribution blocks, etc. must be
located at least 6 inches forward of the flywheel/bellhousing area on
rear-wheel-drive (RWD) vehicles, and on opposite side of
flywheel/housing area on front-wheel-drive (FWD) vehicles. Fuel
pressure gauge isolators, with steel braided line, may be mounted
on firewall.


Tanks: When permitted by class regulations, fuel tanks located
outside body and/or frame must be enclosed in a steel tube frame
constructed of minimum 1 1/4-inch O.D. x .058 chromoly or .118
mild steel tubing. All fuel tanks must be isolated from the driver’s
compartment by a firewall, completely sealed to prevent any fuel
from entering the driver’s compartment. All fuel tanks must have a
pressure cap and be vented outside of body. A positive-locking
screw-on fuel tank cap is mandatory on all open-bodied cars.
Insulated fuel tanks prohibited. When used, fuel cells must have a
metal box protecting the part of the fuel cell that is outside of body
lines or trunk floor, excluding hose connection area in rear. Nonmetallic
fuel cells or tanks must be grounded to frame.

Pssssssst............http://www.wickedstangs.com/forum/s...nstall-*DONE!*&p=155214&viewfull=1#post155214 vv :doh:
 
I knew about the trunk having to be sealed, but I didn't know about the shield to protect the sump, so pssssssssssssssssssssssst yourself! Why didn't you give me a heads up on that!? I think you have to be a member to get a copy of the rulebook no?
 
I am also changing the inlet fuel line. I'm taking out the 90* fitting in favor of a straight and I'm going to use a 45* elbow on the outlet side instead of the 90*. Should be more of a smooth path for the fuel to travel.
 
I knew about the trunk having to be sealed, but I didn't know about the shield to protect the sump, so pssssssssssssssssssssssst yourself! Why didn't you give me a heads up on that!? I think you have to be a member to get a copy of the rulebook no?

Just didn't seem like it was very important to you.........honestly.
 
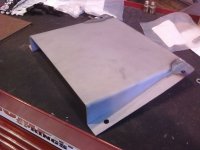
Well on my breaks today I went to work on my sump shield. I made a template out of card board after I was informed of the rule by a member on sbftech.com. I grabbed a piece of metal about 7/64 and layed masking tape over the top of it. From there I layed out my pattern of where to bend everything. I then took it over to the shear and cut my pattern.

Next I went over to the bender and formed my piece. Here is the raw material after everything was bent. I had to tweak it here and there with a hammer, but it came out o.k. and in one piece.

rustysumpshield.jpg


After I shaped it I took it to the sand blaster.
sandblastedsumpshield.jpg


I wanted to make this a bolt on unit, so once home I marked and drilled holes in the fuel cell support bracket. Realizing that I couldn't drill all the way through or I would drill into my new fuel cell, I decided to use riv nuts. I drilled the holes out and installed the riv nuts with my trusty little tool. :naughty:
Rivnuts.jpg


Once the riv nuts were in I test fit the sump shield. I had to elongate the holes a little, but no biggie. It fit up nicely.
testfitsumpshield.jpg


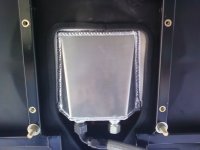
Finally I primed and hit it with some flat black and installed it! :rock
DSCN0655.jpg
DSCN0656.jpg
 
what happened to the tact welds that you were gonna throw on there? boss catch you screwing off? LOL
 
Nice work Bobby. It looks much better primed and painted and up in position. :rock:
 
AHHH....LOL...looks good, im gonna have to buy me a sand blaster one of these days...
 
Back
Top